MustVas Developer Guide
Acknowledgements
MustVas was adapted from AB-3.
Setting up, getting started
Refer to the guide Setting up and getting started.
Design
Architecture

The Architecture Diagram given above explains the high-level design of the App.
Given below is a quick overview of main components and how they interact with each other.
Main components of the architecture
Main (consisting of classes Main and MainApp) is in charge of the app launch and shut down.
- At app launch, it initializes the other components in the correct sequence, and connects them up with each other.
- At shut down, it shuts down the other components and invokes cleanup methods where necessary.
The bulk of the app's work is done by the following four components:
UI: The UI of the App.Logic: The command executor.Model: Holds the data of the App in memory.Storage: Reads data from, and writes data to, the hard disk.
Commons represents a collection of classes used by multiple other components.
How the architecture components interact with each other
The Sequence Diagram below shows how the components interact with each other for the scenario where the user issues the command delete 1.

Each of the four main components (also shown in the diagram above),
- defines its API in an
interfacewith the same name as the Component. - implements its functionality using a concrete
{Component Name}Managerclass (which follows the corresponding APIinterfacementioned in the previous point.
For example, the Logic component defines its API in the Logic.java interface and implements its functionality using the LogicManager.java class which follows the Logic interface. Other components interact with a given component through its interface rather than the concrete class (reason: to prevent outside component's being coupled to the implementation of a component), as illustrated in the (partial) class diagram below.

The sections below give more details of each component.
UI component
The API of this component is specified in Ui.java

The UI consists of a MainWindow that is made up of parts e.g.CommandBox, ResultDisplay, PersonListPanel, StatusBarFooter etc. All these, including the MainWindow, inherit from the abstract UiPart class which captures the commonalities between classes that represent parts of the visible GUI.
The UI component uses the JavaFx UI framework. The layout of these UI parts are defined in matching .fxml files that are in the src/main/resources/view folder. For example, the layout of the MainWindow is specified in MainWindow.fxml
The UI component,
- executes user commands using the
Logiccomponent. - listens for changes to
Modeldata so that the UI can be updated with the modified data. - keeps a reference to the
Logiccomponent, because theUIrelies on theLogicto execute commands. - depends on some classes in the
Modelcomponent, as it displaysPersonobject residing in theModel.
Logic component
API : Logic.java
Here's a (partial) class diagram of the Logic component:

The sequence diagram below illustrates the interactions within the Logic component, taking execute("delete 1") API call as an example.

Note: The lifeline for DeleteCommandParser should end at the destroy marker (X) but due to a limitation of PlantUML, the lifeline continues till the end of diagram.
How the Logic component works:
When
Logicis called upon to execute a command, it is passed to anAddressBookParserobject which in turn creates a parser that matches the command (e.g.,DeleteCommandParser) and uses it to parse the command.This results in a
Commandobject (more precisely, an object of one of its subclasses e.g.,DeleteCommand) which is executed by theLogicManager.The command can communicate with the
Modelwhen it is executed (e.g. to delete a person).
Note that although this is shown as a single step in the diagram above (for simplicity), in the code it can take several interactions (between the command object and theModel) to achieve.The result of the command execution is encapsulated as a
CommandResultobject which is returned back fromLogic.For commands that have no arguments, instead of creates a parser that matches the command (e.g.,
ListCommandParser), theCommandobject(e.g. ListCommand) is simply returned by theAddressBookParser.
Here are the other classes in Logic (omitted from the class diagram above) that are used for parsing a user command:

How the parsing works:
When called upon to parse a user command, the
AddressBookParserclass creates anXYZCommandParser(XYZis a placeholder for the specific command name e.g.,AddCommandParser) which uses the other classes shown above to parse the user command and create aXYZCommandobject (e.g.,AddCommand) which theAddressBookParserreturns back as aCommandobject.All
XYZCommandParserclasses (e.g.,AddCommandParser,DeleteCommandParser, ...) inherit from theParserinterface so that they can be treated similarly where possible e.g, during testing.
Model component
API : Model.java

The Model component,
- stores the ClassBook data i.e., all
Classesobjects. (EachClassesobject has its own AddressBook). - stores the currently selected
Classesinstance, and its correspondingAddressBook. - stores all
Personobjects in theAddressBookof the currently selectedClassesinstance (which are contained in aUniquePersonListobject). - stores the currently 'selected'
Personobjects (e.g., results of a search query) as a separate filtered list which is exposed to outsiders as an unmodifiableObservableList<Person>that can be 'observed' e.g. the UI can be bound to this list so that the UI automatically updates when the data in the list change. - stores a
UserPrefobject that represents the user’s preferences. This is exposed to the outside as aReadOnlyUserPrefobjects. - does not depend on any of the other three components (as the
Modelrepresents data entities of the domain, they should make sense on their own without depending on other components)
Note: An alternative (arguably, a more OOP) model is given below. It has a Tag list in the AddressBook, which Person references. This allows AddressBook to only require one Tag object per unique tag, instead of each Person needing their own Tag objects.

Storage component
API : Storage.java

The Storage component,
- can save addressBook data, classBook data, and user preference data in JSON format, and read them back into corresponding objects.
- inherits from
ClassBookStorage,AddressBookStorageandUserPrefStorage, which means it can be treated one of the above. (if only the functionality of only one is needed). - depends on some classes in the
Modelcomponent (because theStoragecomponent's job is to save/retrieve objects that belong to theModel)
Common classes
Classes used by multiple components are in the seedu.addressbook.commons package.
Implementation
This section describes some noteworthy details on how certain features are implemented.
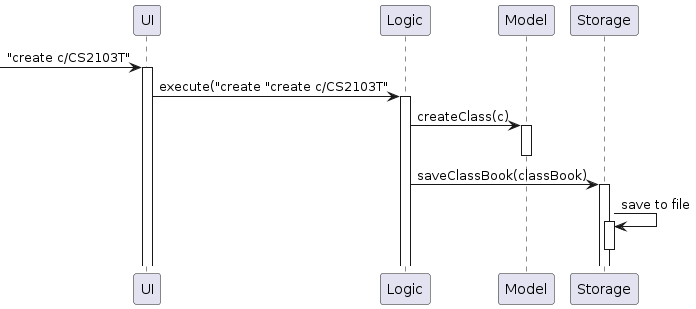
Create Class feature
The create command is used to create a class. Below is the sequence diagram when the create command is used.
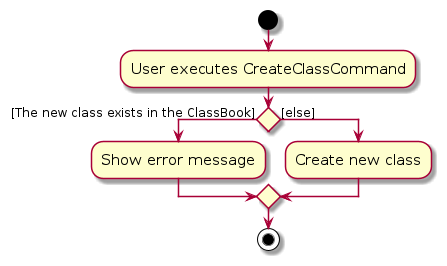
The below activity diagram illustrates the process of creating a new class.
Select Class feature
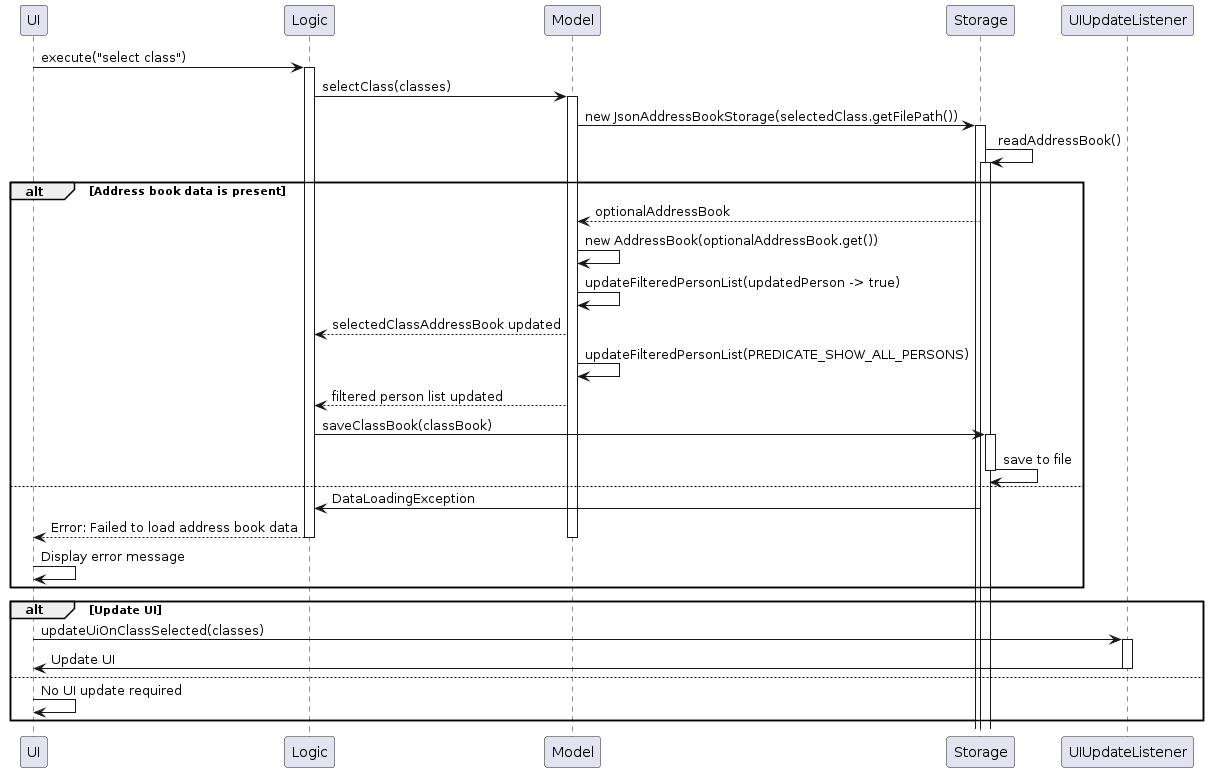
The select command is used to select a class. Below is the sequence diagram when the select command is used.
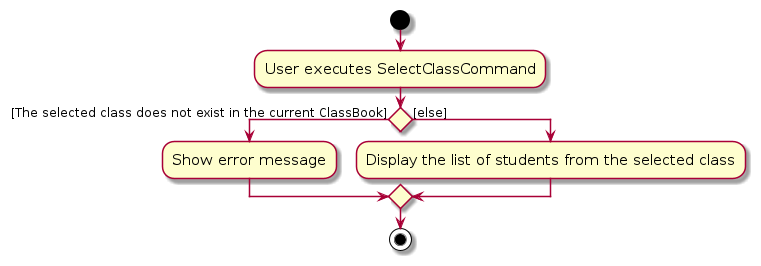
The below activity diagram illustrates the process of selecting a class.
Add feature
The add command is used to add a new student. Below is the sequence diagram when the add command is used.

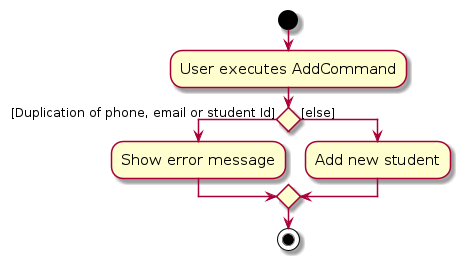
The below activity diagram illustrates the process of adding a new student.
Edit feature
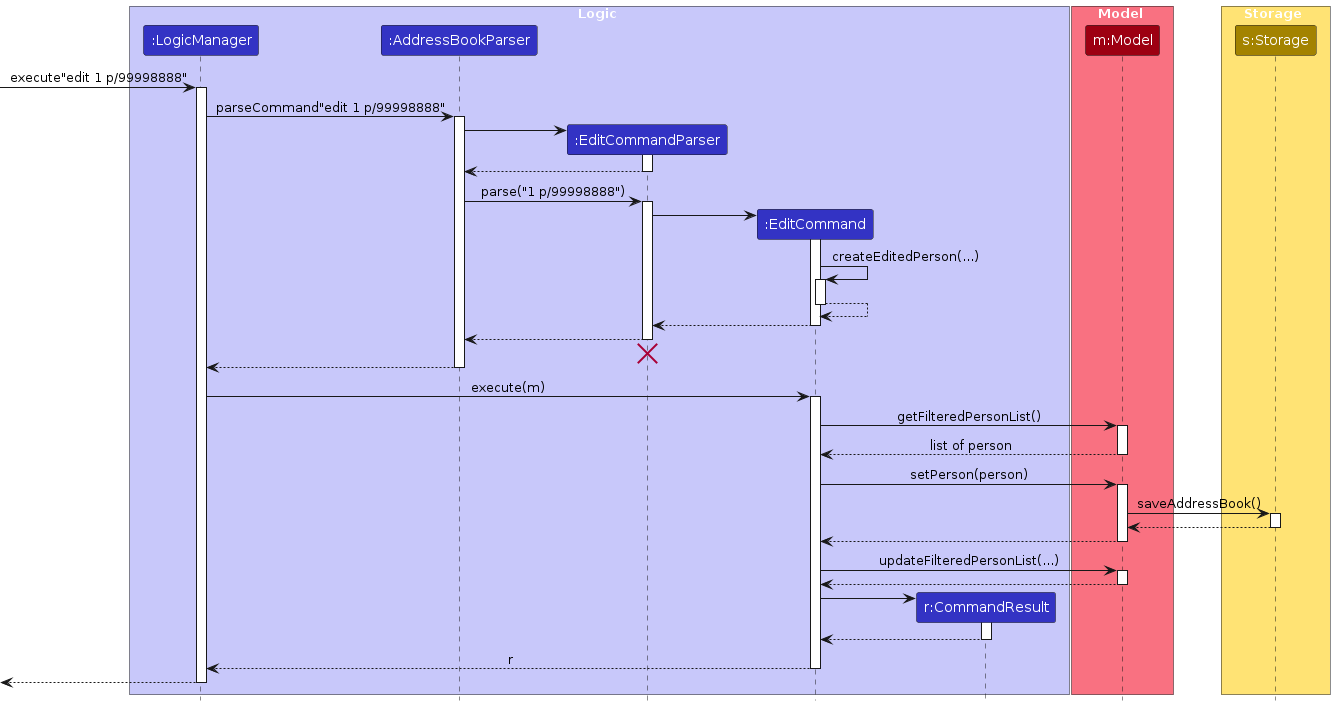
The edit command is used to edit a student's information (name, phone, email, student id, description). Below is the sequence diagram when the edit command is used.
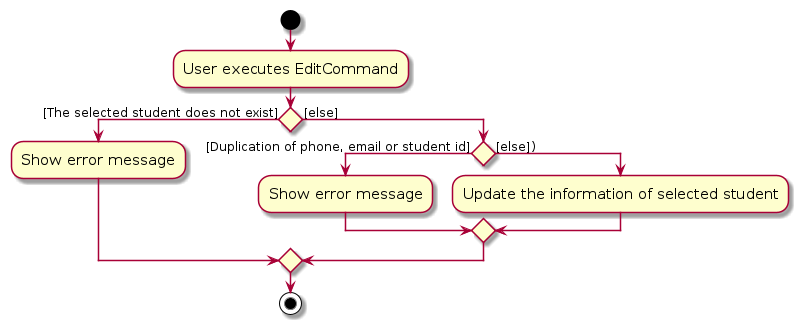
The below activity diagram illustrates the process of editing a student.
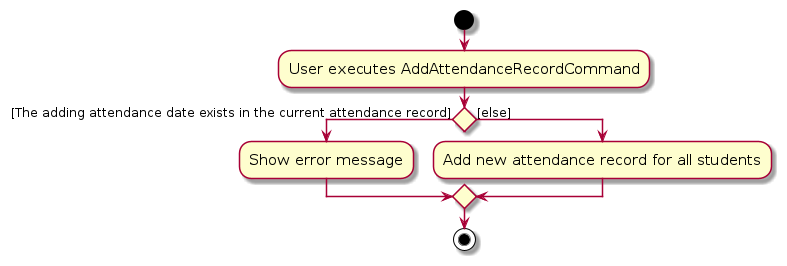
Add attendance record feature
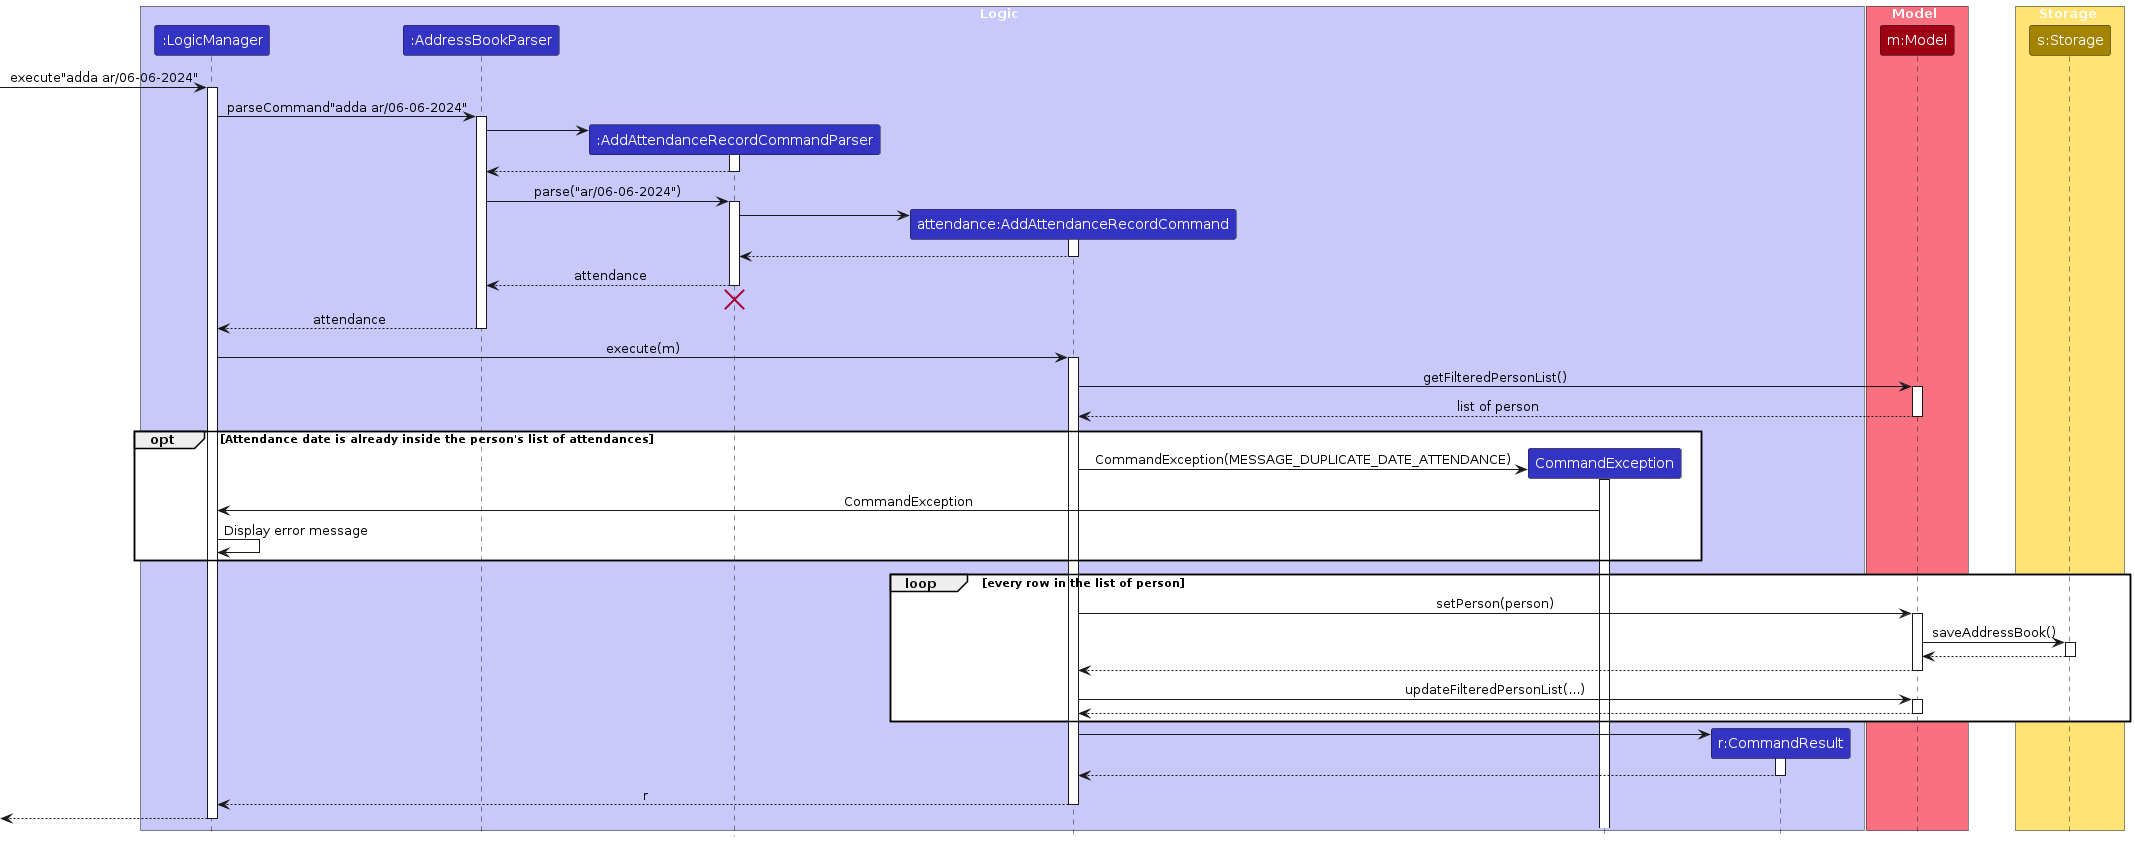
The adda command is used to add an attendance record to all students. Below is the sequence when the adda command is used.
The below activity diagram illustrates the process of adding a new attendance record.
Edit attendance record feature
The edita command is used to edit an attendance record of some students. Below is the sequence when the edita command is used.
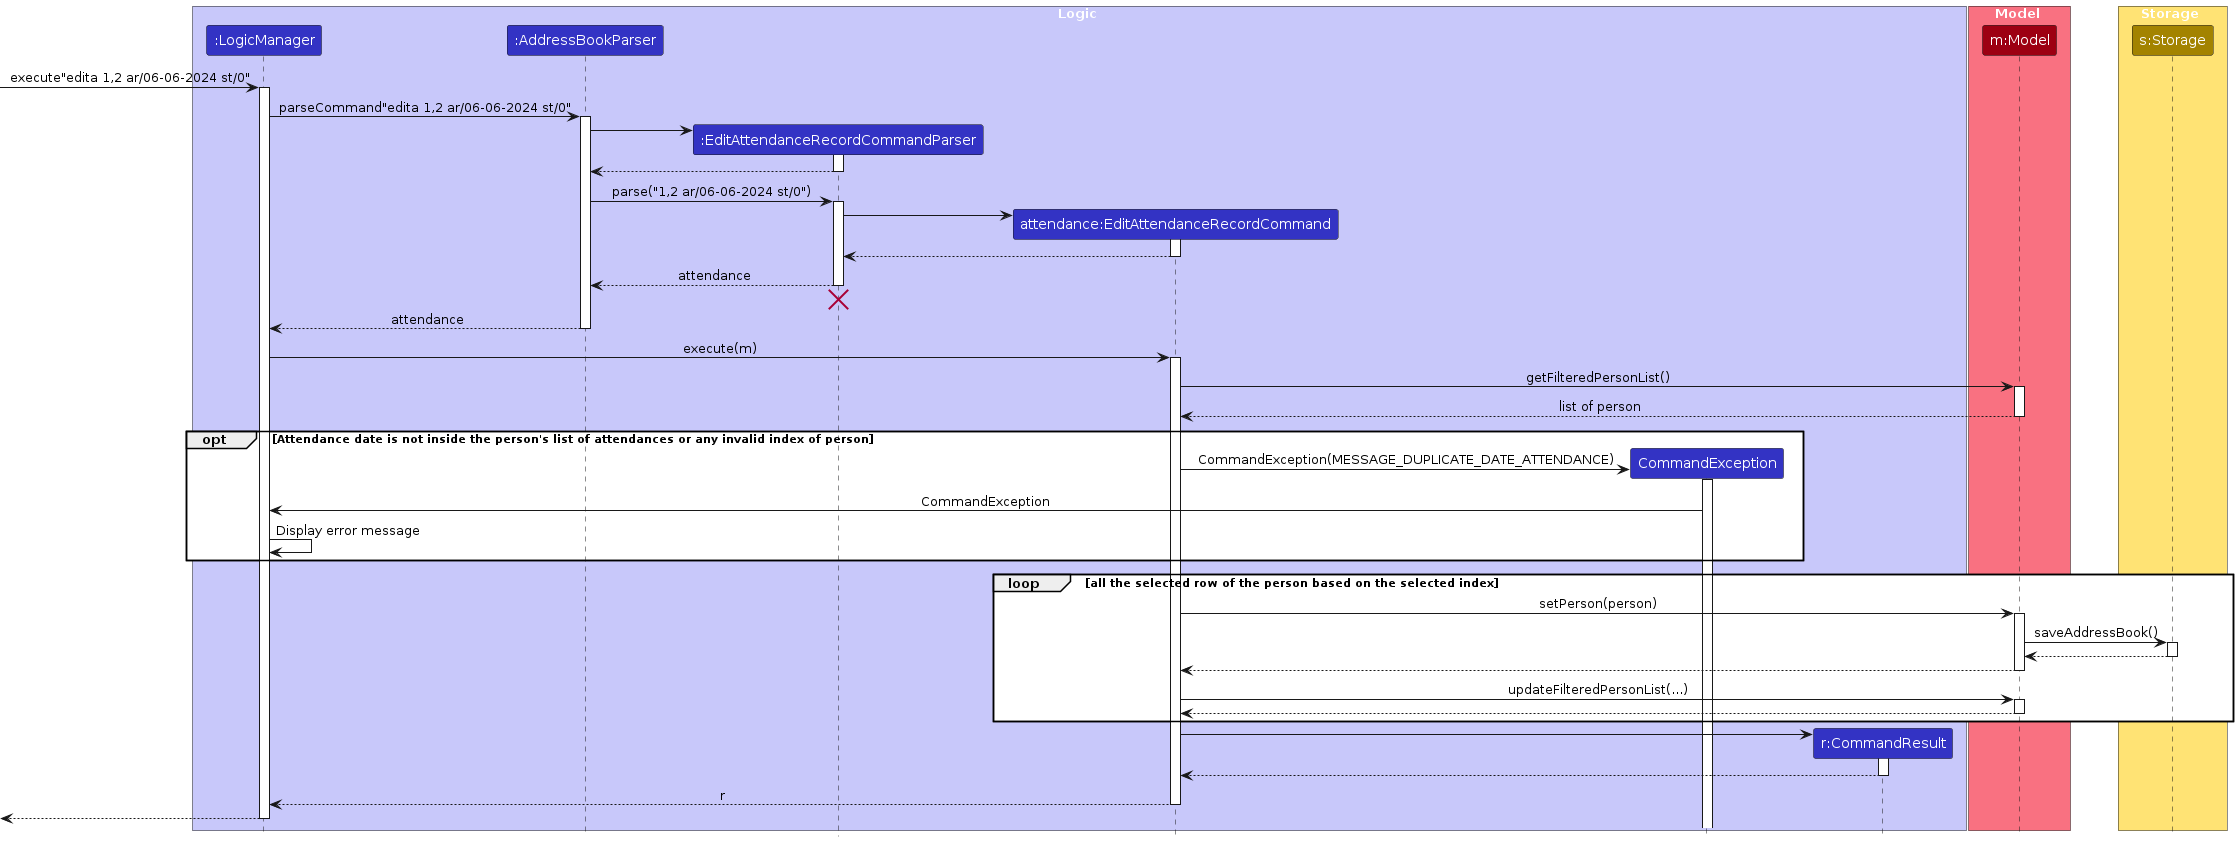
The below activity diagram illustrates the process of editing an attendance records for the selected students.

Delete attendance record feature
The dela command is used to delete an attendance record of all students. Below is the sequence when the dela command is used.
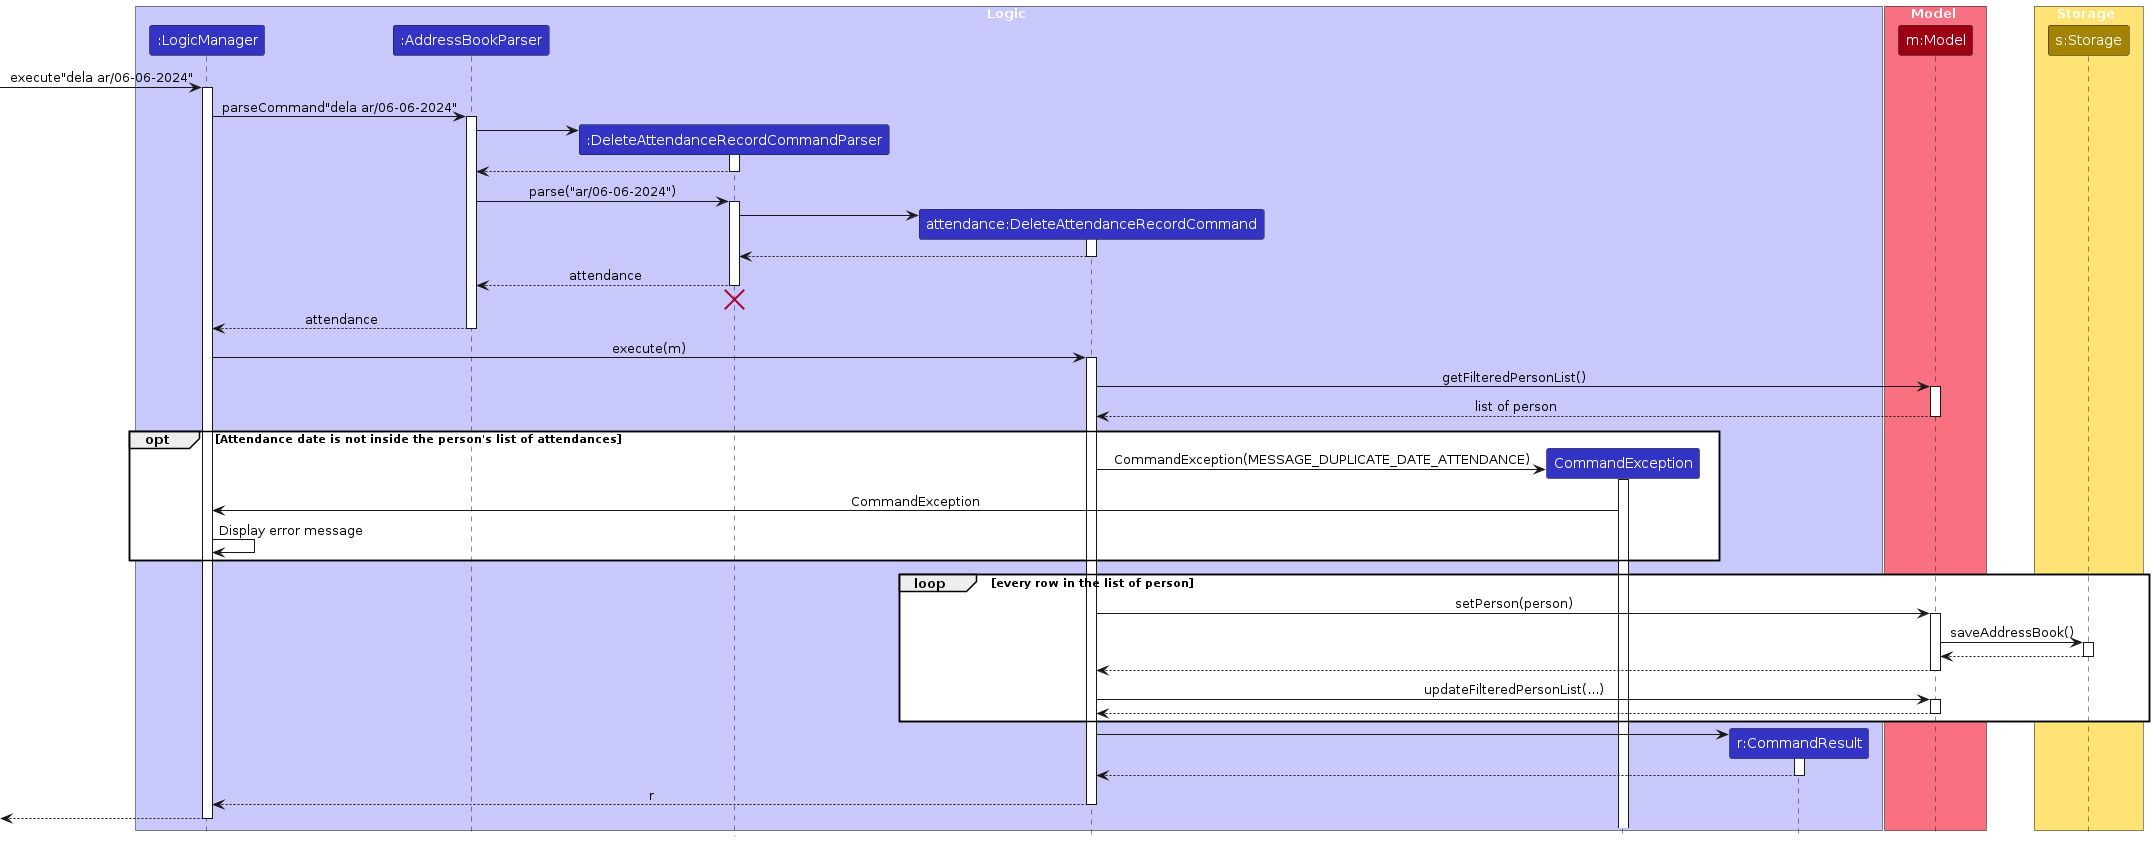
The below activity diagram illustrates the process of deleting an attendance record.

Implementation of Classes feature
The Classes feature is built using the basic structure of AddressBook. Classes represents a tutorial class.
1. Basic structure
A ClassBook instance holds all current Classes instances. This is stored in the data folder as classbook.json
file.
Each Classes instance contains an instance of Addressbook, which holds a list of Person instances
representing the students in the Class. Each Classes instance stored in data as [className].json where
className is the name of the Classes instance e.g. CS2103.json
2. Changes to Storage
Problem 1:
The original structure of AB3 only allows for a single file path for storage, which was set to addressbook.json
by default. This was a big problem, as our intended implementation of the Classes feature necessitated
multiple .json files to make sharing data between tutors easier.
Solution 1 v1.0:
Rather than use the filepath specified in the preferences.json, ModelManager was changed to use
its own instance of Storage, to call the saveAddressBook with selectedClass.getFilePath()
as the second parameter. This works, but SLAP is not ideal with the current implementation.
3. Changes to UI
Problem 1:
Since the original AB3 had only one command (find) that required the UI to be updated, the UI was implemented to update
based on the contents of the filteredPersonsList. This was inadequate for our classes feature, which
requires the UI's PersonListPanel to be updated upon selecting a different class.
Solution 1:
A list of UiUpdateListener - List<UiUpdateListener> uiUpdateListeners is created in ModelManager by calling
modelManager.addUiUpdateListener(uiManager); in MainApp. The listeners monitors for calls to the select command,
and call mainWindow.fillInnerParts() to update the UI PersonListPanel.
Documentation, logging, testing, configuration, dev-ops
Appendix: Requirements
Product scope
Target user profile:
- NUS Teaching Assistants (TAs) who has to keep track of students' profile and attendance record during class.
- Has a need to manage a significant number of contacts, including potentially different classes.
- Manages student's profile such as contact information, attendance, etc.
- Prefer desktop apps over other types.
- Able to type fast.
- Prefers typing to mouse interactions.
- Is reasonably comfortable using Command Line Interface (CLI) applications.
Value proposition: Makes tutors life easier by increasing convenience of checking progress and compacting all the relevant information for easy access (Student contact information, attendance records, summary of attendance statuses, etc.)
User stories
Priorities: High (must have) - * * *, Medium (nice to have) - * *, Low (unlikely to have) - *
| Priority | As a … | I want to … | So that I can… |
|---|---|---|---|
* * * | User who teaches multiple classes | View my classes | See all the classes I'm currently managing at a glance |
* * * | User who teaches multiple classes | Select the class that I want to manage | Easily manage multiple classes |
* * * | User who teaches multiple classes | Create new class | Separate students into their respective classes |
* * * | User who teaches multiple classes | Delete class | Remove classes that is not needed anymore |
* * * | User who manages students | Add a new student to the class | Keep track of my students' profiles |
* * * | User who manages students | Delete a student from the class | Keep an updated record of students in the class |
* * * | User who manages student attendance | Create an attendance record for my students | Acknowledge a student's attendance (PRESENT, ABSENT, VALID REASON) |
* * * | User who manages student attendance | Delete an attendance record | Remove any unnecessary attendance records |
* * | User who manages students | Write descriptions for each student | Take note of certain students based on the description |
* * | User who manages students | Create assignments and grades for each student | Track my student's grades |
* * | User who manages student attendance | Edit the attendance record of students | Conveniently make changes to attendance when necessary |
* * | User who manages student attendance | View the attendance rate of a student | Easily view the student's overall attendance rate at one glance |
* * | Organised user | Browse students in the default alphabetical setting | easily scroll to find a particular contact |
* * | New user exploring the app | Access the user guide easily via a help button | Learn how to use the app |
* | Forgetful user | Schedule reminders for specific contact | Don't miss important dates or admin tasks |
* | User who uses Canvas LMS | Import the attendance data into Canvas | Easily upload attendance statistics for the school admin |
* | User who looking to be more efficient | Send emails/texts to an entire class | Easily communicate information to the students |
* | User who looking to be more efficient | Generate attendance reports | Easily submit them to school admin |
* | User who looking to be more efficient | Export Student date in multiple formats (etc. PDF) | Share the data with other tutors or professors easily |
Use cases
(For all use cases below, the System is the MustVas and the Actor is the user, unless specified otherwise)
Use case: Select a class when the program is first opened (UC-01)
MSS
- User enters the program.
- MustVas shows a list of classes.
- User selects a class (UC-04).
Use case ends.
Extensions
2a. The list is empty.
- 2a1. MustVas shows a message that the list is empty. (Not implemented due to feature freeze)
Use case ends.
3a. The user enters an invalid class index.
- 3a1. MustVas shows an error message about selecting an invalid class.
Use case ends.
Use case: Create new class (UC-02)
MSS
- User requests to create new class with all the details.
- MustVas shows the created class.
Use case ends.
Extensions
1a. Enter an invalid class name (Contains non-alphanumeric characters, Contains spaces, or blank).
- 1a1. MustVas shows an error message stating the correct format
1b. Enter a duplicate class.
- 1b1. MustVas shows an error message stating the class alrea
Use case ends.
Use case: View list of classes (UC-03)
MSS
- User requests to view a list of classes.
- MustVas shows the list of stored classes.
Use case ends.
Extensions
1a. Enter an invalid command.
- 1a1.MustVas shows the list of stored classes.
Use case ends.
Use case: Select a class of students to manage (UC-04)
MSS
- User request to view the list of classes (UC-03).
- User requests to select a class.
- MustVas shows the details of the selected class.
Use case ends.
Extensions
1a. Enter an invalid class index.
- 1a1. MustVas shows an error message stating the provided class index is invalid
Use case ends.
Use case: Add a student to a class (UC-05)
MSS
- User enters the program (MustVas).
- User selects a class (UC-04).
- User then inputs the command 'add' to check how to enter command.
- User then inputs details for the command 'add'.
- MustVas then adds the student to the selected class and displays all relevant details in the console.
Use case ends.
Extensions
3a. User enters invalid details.
- 3a1. MustVas shows an error message.
3b. Required fields are left empty.
- 3b1. MustVas shows an error message.
3c. User tries to add duplicate student.
- 3c1. MustVas shows an error message.
Use case ends.
Use case: Delete a student from a class (UC-06)
MSS
- User enters the program (MustVas).
- User selects a class (UC-04).
- User inputs the command to delete a student record from selected class.
- MustVas confirms the deletion and removes the student from the selected class.
Use case ends.
Extensions
3a. User enters invalid command.
- 3a1. MustVas shows an error message.
Use case ends.
Use case: Add attendance record for a class of students (UC-07)
MSS
- User enters the program (MustVas).
- User selects a class (UC-04).
- User inputs the command to add an attendance record for all students.
- MustVas confirms the added attendance, stores the attendance records for all students in the class, and show the updated attendance records.
Use case ends.
Extensions
2a. User enters invalid command.
- 2a1. MustVas shows an error message.
Use case ends.
3a. User inputs an invalid command.
- 3a1. MustVas shows an error message.
Use case ends.
Use case: Edit attendance record for some students (UC-08)
MSS
- User enters the program (MustVas).
- MustVas shows the layout of the program.
- User selects a class (UC-04).
- User inputs the command to edit an attendance record for some students.
- MustVas confirms the edited attendance records, stores the attendance records for the selected students in the class, and show the updated attendance records.
Use case ends.
Extensions
3a. User enters invalid command.
- 3a1. MustVas shows an error message.
Use case ends.
4a. User inputs an invalid command.
- 4a1. MustVas shows an error message.
Use case ends.
Use case: Delete attendance record for a class of students (UC-09)
MSS
- User enters the program (MustVas).
- MustVas shows the layout of the program.
- User selects a class (UC-04).
- User inputs the command to delete an attendance record for all students.
- MustVas confirms the deleted attendance records, stores the existing attendance records for all students in the class, and show the updated attendance records.
Use case ends.
Extensions
3a. User enters invalid command.
- 3a1. MustVas shows an error message.
Use case ends.
4a. User inputs an invalid command.
- 4a1. MustVas shows an error message.
Use case ends.
Use case: Add description about a student (UC-10)
MSS
- User enters the program (MustVas).
- User selects a class (UC-04).
- User inputs the command to add description to a student.
- User inputs the description details.
- MustVas saves the description for the selected student.
Use case ends.
Extensions
2a. User enters invalid command.
- 2a1. MustVas shows an error message.
Use case ends.
3a. User inputs an invalid command.
- 3a1. MustVas shows an error message.
Use case ends.
Use case: Remove a class (UC-11)
MSS
- User enters the program (MustVas).
- User inputs command to view the list of classes.
- User inputs the command to remove a class.
- User selects the class to be removed from the list.
- MustVas removes the selected class and all associated data from the system.
Use case ends.
Extensions
2a. User enters invalid command.
- 2a1. MustVas shows an error message.
Use case ends.
3a. User inputs an invalid command.
- 3a1. MustVas shows an error message.
Use case ends.
4a. User inputs invalid class.
- 4a1. MustVas shows an error message.
Use case ends.
Non-Functional Requirements
- Should work on any mainstream OS as long as it has Java
11or above installed. - Should be able to hold up to 1000 students without a noticeable sluggishness in performance for typical usage.
- A user with above average typing speed for regular English text (i.e. not code, not system admin commands) should be able to accomplish most of the tasks faster using commands than using the mouse.
- Each class should accept up to 30 students without issue
- There should not be any duplication of students in the same class.
Glossary
- Mainstream OS: Windows, Linux, Unix, MacOS
- Json File: A file to store the data used in the program
- MSS: Main Success Scenario which outlines the steps that users take when using the product in various scenarios
- ClassBook: List of classes
- StudentBook: List of students in individual classes
Appendix: Instructions for manual testing
Given below are instructions to test the app manually.
Note: These instructions only provide a starting point for testers to work on; testers are expected to do more exploratory testing.
Launch and shutdown
Initial launch
Download the jar file and copy into an empty folder
Double-click the jar file Expected: Shows the GUI with a set of sample contacts. The window size may not be optimum.
Saving window preferences
Resize the window to an optimum size. Move the window to a different location. Close the window.
Re-launch the app by double-clicking the jar file.
Expected: The most recent window size and location is retained.
Viewing the classes
- Viewing the classes
Prerequisites: Nil
Test case:
view(at least one class)
Expected: Classes are displayed in the UI, each labelled with an index number(e.g. "1:CS2103 2:CS2101")Test case:
view(no classes)
Expected: Interface displays a message stating you are not managing any classes, and prompts tocreatea classTest case:
view randominput1234567
Expected: Identical behaviour toview, Classes are displayed in the UI, each labelled with an index number(e.g. "1:CS2103 2:CS2101")
Selecting a class
- Selecting a class
Prerequisites: At least one class must have been created. You may use
viewto see all current classes (Note: It is not compulsory to useview, as long as you know the index, you canselectyour desired class)Test case:
select 0
Expected: No class is selected. Error details shown in the status message.Test case:
select 1(At least one class exists)
Expected: The first class by index is selected. The filepath of the class' .json file will be shown on the bottom left corner/Test case:
select 10(There are less than 10 classes)
Expected: No class is selected. Error details shown in the status message.
Removing a class
- Removing a class
Prerequisites: At least one class must have been created. You may use
viewto see all current classes (Note: It is not compulsory to useview, as long as you know the index, you canrmyour desired class)Test case:
rm 0
Expected: No class is removed. Error details shown in the status message. The current filepath (in the bottom left corner) is not changedTest case:
rm 1(At least one class exists)
Expected: The first class by index is selected. The current filepath (in the bottom left corner) will be changed to.\No class selected!. (Note: Even if another class is selected, when any class is deleted, the .json file will be closed and the filepath will be displayed as.\No class selected!.)
Deleting a person
Deleting a person while persons are being shown
Prerequisites: At least one person shown in the interface. You may
selecta class,finda person,adda person or uselistto see all persons in a class (note:listis automatically called when youselecta class, so if the selected class has at least one person in it, they will show up in the interface).Test case:
delete 1
Expected: First contact is deleted from the list. Details of the deleted contact shown in the status message.Test case:
delete 0
Expected: No person is deleted. Error details shown in the status message. Status bar remains the same.Test case:
delete 1(no class selected)
Expected: Interface prompts you toselecta class firstOther incorrect delete commands to try:
delete,delete x,...(where x is larger than the list size)
Expected: No person is deleted. Error details shown in the status message. Status bar remains the same.
Adding a description
Adding a description while all persons are being shown
Prerequisites: At least one person shown in the interface. You may
selecta class,finda person,adda person or uselistto see all persons in a class (note:listis automatically called when youselecta class, so if the selected class has at least one person in it, they will show up in the interface).Test case:
description 1 desc/Hello
Expected: First student/contact has a description added to them. Details of where the description has been added is shown.Test case:
description 0 desc/Hello
Expected: Error message thrown. No description is added to any contact.Other incorrect description commands:
description 1 Hello,description,description desc/Hello,description x desc/Hello(Where x is larger than the list size)
Expected: Error message thrown. No description is added to any contact.Adding a description works in concurrence with add/edit commands as well. As long as their prerequisites are met, and description is following a prefix
desc/, it should work effectively.
Saving data
Dealing with missing/corrupted data files
- A missing data file of a StudentBook may occur if user accidentally deletes the
.jsonfile of the class.
A corrupted data file may occur if user accidentally edits the.jsonfiles manually and inputs invalid data.
Expected: All data from that missing/corrupted file is wiped. A newclassbook.jsonor new[class].jsonwill be created when program runs again.
- A missing data file of a StudentBook may occur if user accidentally deletes the